Virtual Kids Birthday Party in Minecraft
So my son had his tenth birthday recently, and what with the Coronavirus induced shutdown and self-isolation/quarantine, a real birthday party with his friends was of course no option.
Thus, I set out to organize a virtual birthday party in Minecraft instead. What’s the difference to just playing together online? Well, for one thing I set up a dedicated server for my son and his friends, where I ran a custom created world with a personalized scavenger hunt. We sent formal invitations by mail, and with set date, time and duration, the whole thing very quickly began to feel like a real party.
So here is a ‘run book’ of the whole thing:
The invitation
First things first, I created an invitation in CorelDraw – you can of course use anything you feel comfortable with, such as Adobe Photoshop or MS Powerpoint. You can find Minecraft fonts here, and most are free for personal use.
You can find images via Google’s image search. Make sure to check the option “Tools -> Usage Rights -> Labeled for noncommercial reuse with modification”.
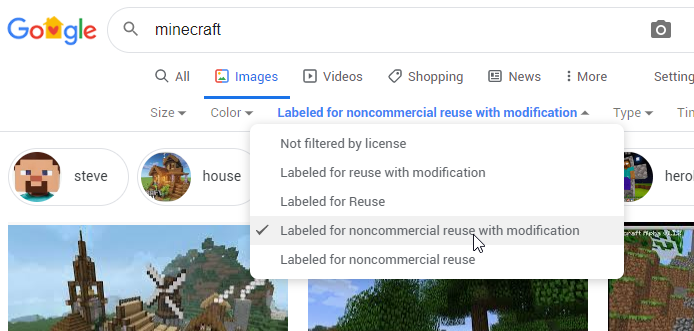
This way, you are not accidentally using images which are copyrighted. It’s a good idea to still check the source for copyright notices and usage rights.
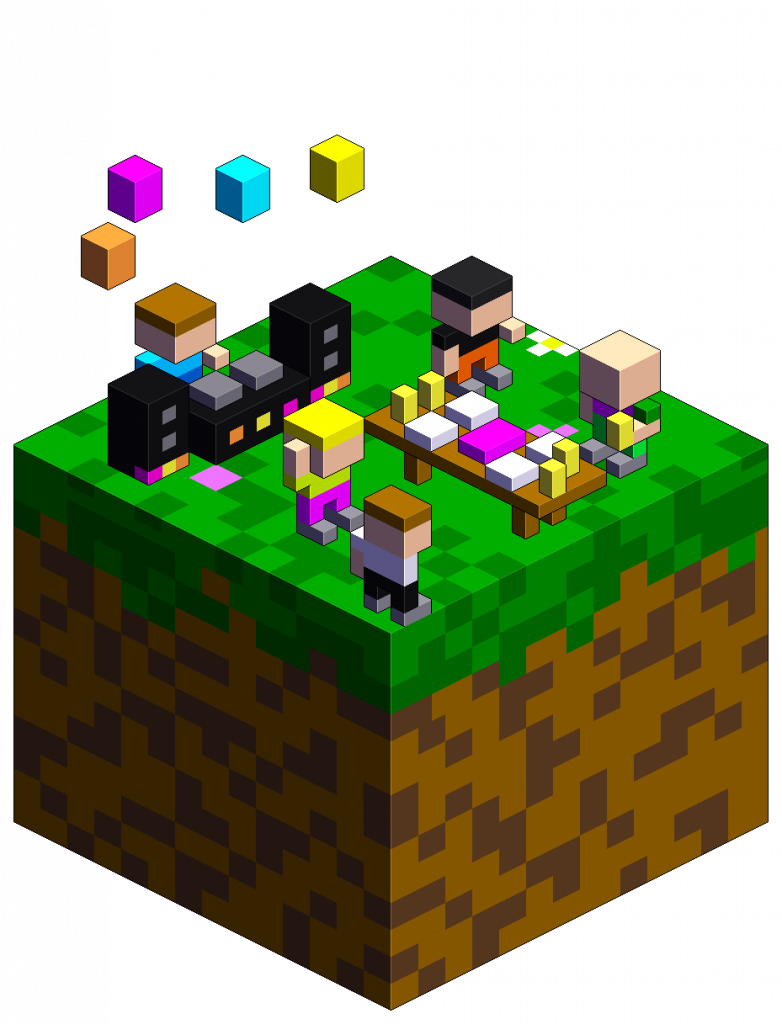
Here is the invitation I did:

In order to not run into copyright problems, I went with a custom image I produced using the outstanding MagicaVoxels which I cannot recommend highly enough. In a subsequent post, I will link to the artwork which you can use freely under the Creative Commons license.
The guests
My recommendation is to keep the party small. Whereas a real life party of 10 kids is not a problem, on a Minecraft server things can get chaotic and disorganized fast, which can be fun but often really isn’t. Three or four (including your kid) is a good size.
Make sure that all invited already play Minecraft, as otherwise you will have guests who need to learn the game first and probably will not be able to keep up with the more experienced kids.
A tale of two Minecraft editions
One important detail to keep an eye on is that there are essentially two different editions of Minecraft: ‘Java’ and ‘Bedrock’. The Java edition is the original one, and the one used on most public servers. It is much easier to modify and extend, and that’s why it’s vastly preferred by more serious players.
The Bedrock edition has been created by Microsoft after they bought Minecraft. Note that you cannot mix versions, so everybody invited must play either the Java or the Bedrock version. So before starting the party, check that everybody is on the same page and using the same edition.
The world
Frankly, the automatically generated worlds Minecraft produces are a bit bland and boring after a while. For a party, you don’t have the time to let everybody build intricate things themselves to make the world more interesting. Therefore, I highly recommend editing the world before the party.
You can do that locally on your PC. To do so,
- Start Minecraft
- Select ‘Singleplayer’
- Click on ‘Create New World’
- Enter a recognizable name for the world
- Select ‘Game Mode: Creative’
- Click on ‘Create New World’
This will create a world you can modify to your liking. Very importantly, decide carefully which version of Minecraft you use. A world created in one version cannot be played in earlier versions, and may cause problems in later versions.
I recommend using version 1.12.2 because this is a version for which there is a nice little world editor available (more on that below).
The starting point
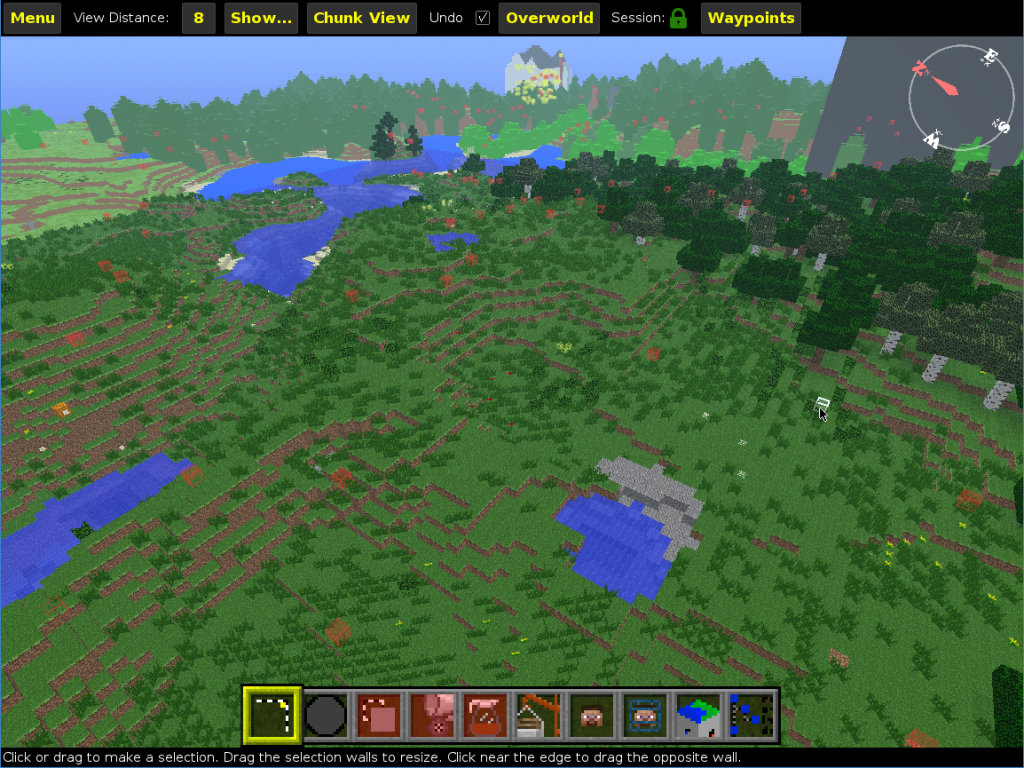
Once you have created the world, build a little starting point. This could be a nice little party scene with a table, (square) balloons, food and drinks; it could be a full-scale mansion, an expedition camp – think of something that sets the mood for the journey ahead. I went with a little pavillion:
In the starting area, add a bit of equipment – pickaxes, swords, armor, some food. Not end game stuff, just things that help getting started. Expect kids to immediately start poking at stuff and taking things apart – so warn them if there is something important they should not destroy, such as the first hint for the scavenger hunt.
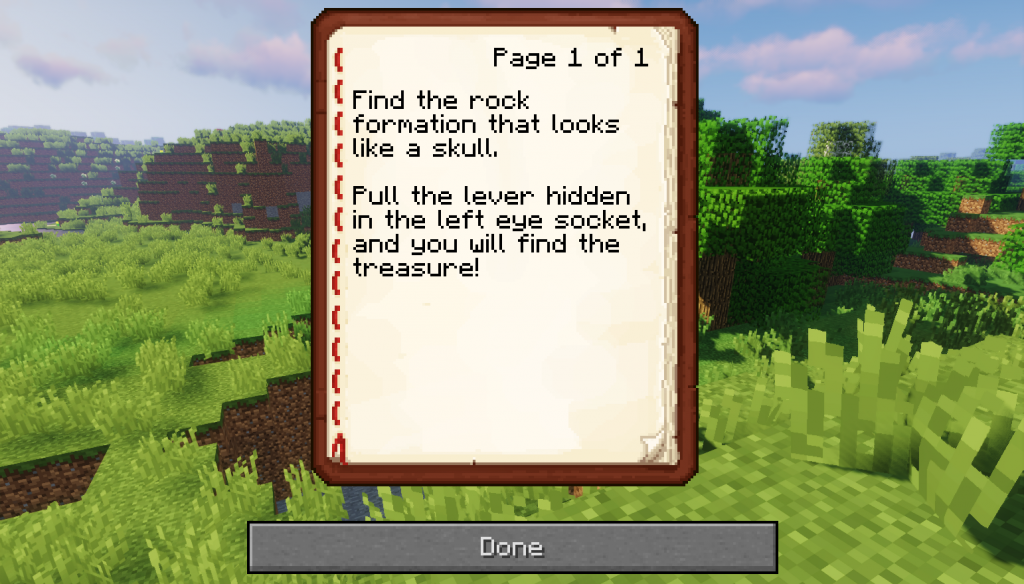
The scavenger hunt
Now the idea is to place a number of waypoints throughout the world and at each waypoint, leave a hint to the next one.
You can get as creative as you like – just keep in mind the age and skillset of your target audience. Kids are surprisingly resourceful, so don’t underestimate them. Try to come up with interesting puzzles, and where in doubt, lean towards more dfficult – you can give additional hints later on.
For hints, you can use things like signs, books, torches, or levers.

You can map out paths by using stone pavement:

… but also banners…

… or redstone:

Mines and dungeons
Of course Minecraft wouldn’t be much fun without mines – or dungeons, for that matter. Now, mines are generally easy to create: Simply dig into the ground and carve out some nice mine shafts.
If you want larger caverns, either dig until you stumble upon natural caves, or make some by placing copious amounts of TNT and light them up. Just make sure that you are deep enough underground that the explosion doesn’t make a hole in the cavern roof.
One of the more interesting things a mine can have, are minecart tracks. These are easy to do, just make sure that you add a powered rail (along with a redstone torch) every now and then in order to ensure fast travelling (unless you want to slow down the journey for strategic reasons).


Few things are more fun than a fast paced ride through a large, convoluted network of mine shafts.
Adding buildings
Your Minecraft adventure will be much more interesting if you pepper the landscape with a couple of nice looking buildings. Unfortunately creating buildings from scratch can be really time consuming. Fotunately, the internet is full of ready made creations you can add to your world.
https://www.mcedit-unified.net/Minecraft doesn’t have the tools to do so on board. Instead, you can use an external editor called MCEdit Unified. As of writing, the latest version was 1.5.6.0 which can edit Minecraft worlds up to version 1.12.2. Be careful, though, as there is a new project called MCEdit 2 which is still in beta. It allows to edit more recent Minecraft worlds but still has bugs and isn’t very stable, so for the time being I recommend sticking with MCEdit Unified.
Once you have downloaded and installed MCEdit, you can start it and be greeted by a spartanic menu:
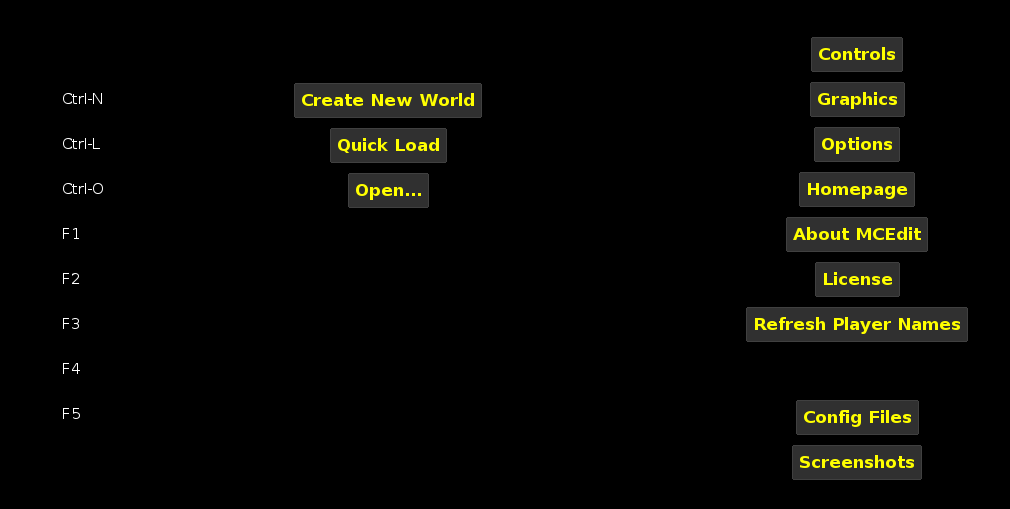
When you click on ‘Quick Load’, you will see a list of worlds you have recently played.
Important: Never have a world open in both MCEdit and Minecraft – this will likely corrupt your world files.
Open your world by selecting it and clicking on ‘Load’. You will see a 3D view of your world, from the position where you last saved.
MCEdit takes a little getting used to. You can navigate with W, A, S, and D, and look around with the mouse by holding the right mouse button.
You can copy and pate things. Click on one corner of the structure you want to copy, then on the opposite corner. This creates a selection box. You can modify the box by hovering over one side of the box, and then dragging it along the respective axis. Then in the menu on the lefthand side, you can click ‘Copy’. Your structure will appear in the clipboard in the upper right corner.

Now select a place wher you want to paste, and click on ‘Paste’. Don’t worry – you still have the chance to arrange things before actually pasting. The structure from the clipboard will appear in your world in a highlighted green box:
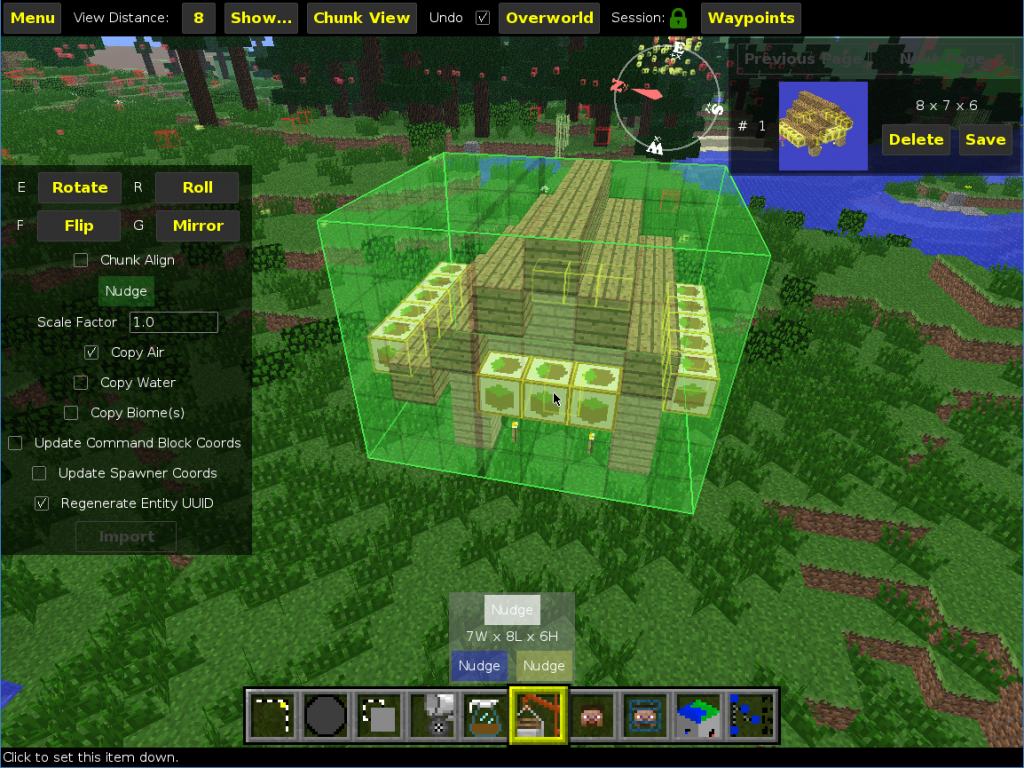
You can now click inside the scene to place your structure. Now you can ‘nudge’ it by pressing and holding the mouse button over the ‘Nudge’ button. This allows you to move the structure one block at a time via W, A, S, D, Shift, and Space. Once you are happy with the placing, click on ‘Import’.
Be careful: If you select the option ‘Copy air’, all existing blocks will be replaced – even if the selection contained air. This can lead to rectangular ‘craters’ if you have positioned your selection box below the surface. If you do not copy air, the internal parts of your structure may fill up with existing landscape.
Now, there is a large collection of ready-made structures on the internet. They come in two variants: Whole world maps, which you open and play just like a world you have created yourself. These need to be downloaded and copied into the folder ‘saves’ of your Minecraft installation (you can find this folder by opening Windows Explorer, entering %appdata% into the address bar, then navigating to the folder .minecraft).
And schematics – these are filders with the extension ‘.schem’ or ‘.schematic’. Schematics are smaller structures which you can directly import in MCEdit. You can find these by googling for ‘minecraft schematics’ and a keyword such as ‘mansion’.
Please check if a schematic has usage or copyright limitations. Usually private use is ok, but there are exceptions. Also, commercial use is in most cases not ok and requires at least explicit permission from the creator. And if you have no commercial intentions, but want to include a schematic on a public server, you need to specifically check if this is allowed.
As an example, I import the marvelous ‘Ygdrassil’s Retreat’ (sic) by ciaran201197 from minecraft-schematics.com. Once the file is saved on my PC, I can click on the Import icon at the bottom (sixth from the left), then select the file:
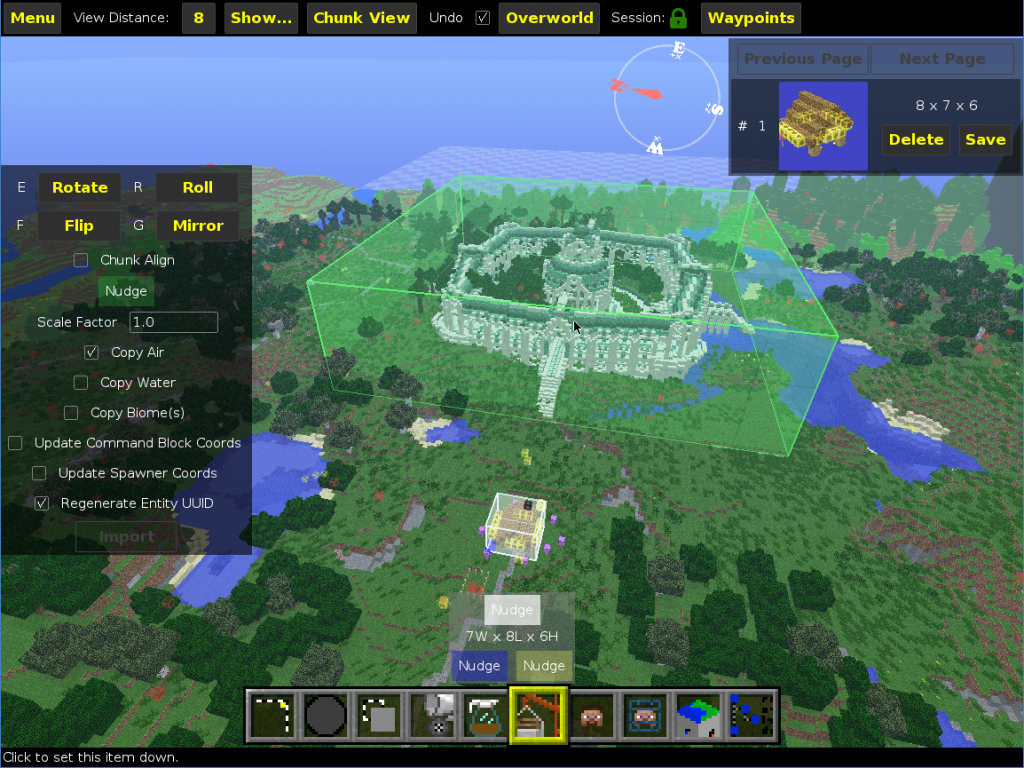
The rest works just like with copy and paste: You can finetune the position by ‘nudging’ the structure, then click ‘Import’.

Large scale landscaping
You may want to sculpt the landscape on a larger scale, such as creating or removing hills, excavating caverns or leveling an area for a big house. MCEdit can do all of that.
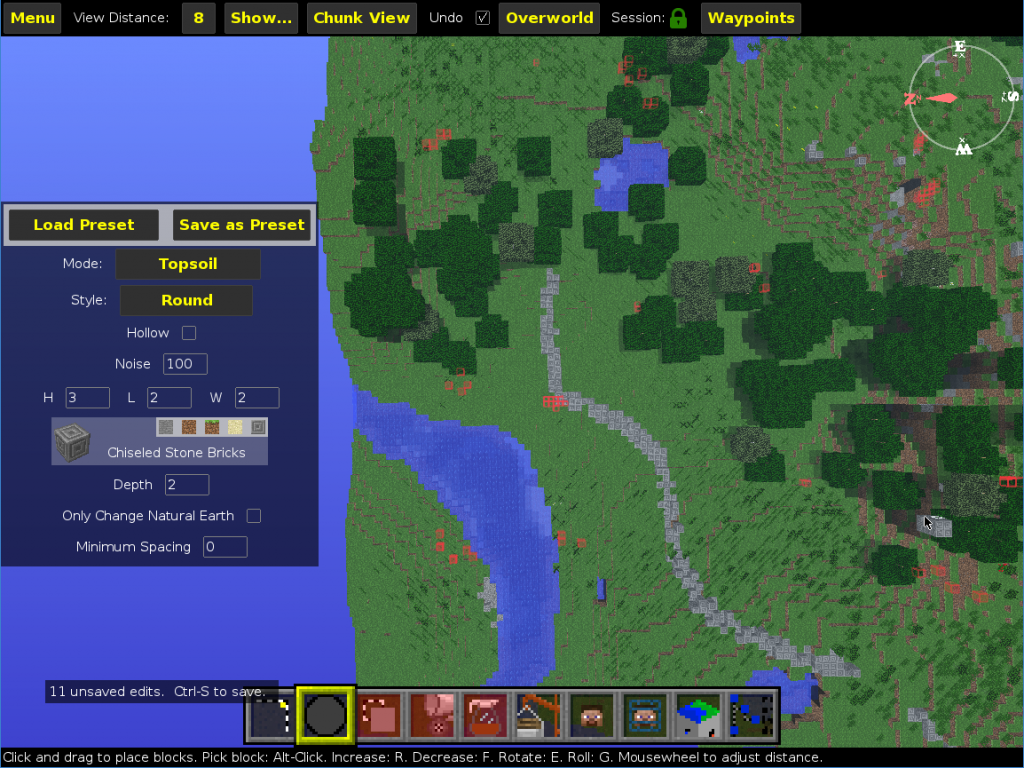
For leveling, you can select an area and delete all blocks in it. For actual sculpting, you can use the ‘brush’ tool (second icon from the left). The brush tool takes a 3D shape (sphere, cube, or diamond) and a mode. With the mode ‘Fill’ and the ‘Round’ style, you can quickly add raised land. Simply select the desired material, such as stone, and drag the mouse over the area wher you want blocks to be added. By adjusting the height, width, and length of your ‘brush’, you can make broader or smaller changes:

At the place where you have dragged the mouse, yellow placeholder blocks appear. Once you release the mouse button, they are replaced by the material you selected, such as stone:

In the same way, you can use ‘Erode’ mode to remove terrain. You usually want to finish with the mode ‘Topsoil’, which allows to change the topmost layer of blocks to something else, e.g. the ‘grass’ block.
Roads and paths
One nice addition to the world are roads and paths. You can build those from things like sand or chiseled stone (or use something fancy like golden blocks). Building a road manually takes a lot of work. You can make it easier by using, again, the brush tool from MCEdit. Use the following settings:
- ‘Round’ style with a width and length corresponding to the desired width of your road
- Mode ‘Topsoil’
- Height: 2 or 3
- Depth: 2
- Noise: 100
- Minimum spacing: 0
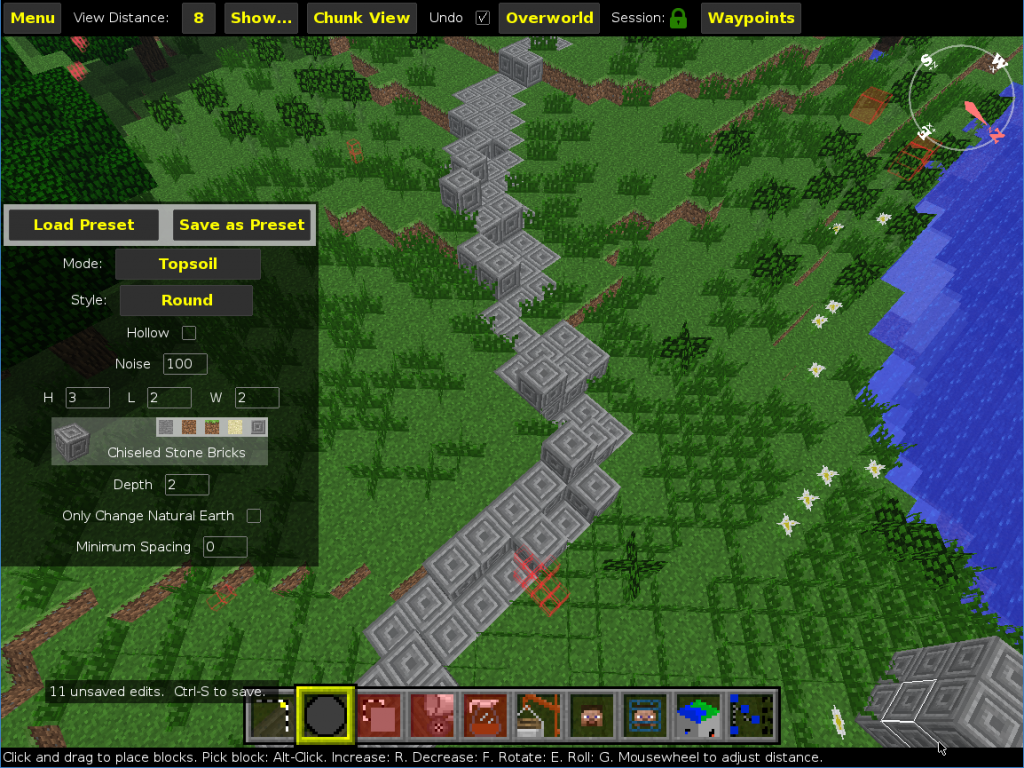
Then point the mouse straight to the ground, zoom out by pessing shift, then drag the mouse along the desired path slowly, so that you create a contiguous line.
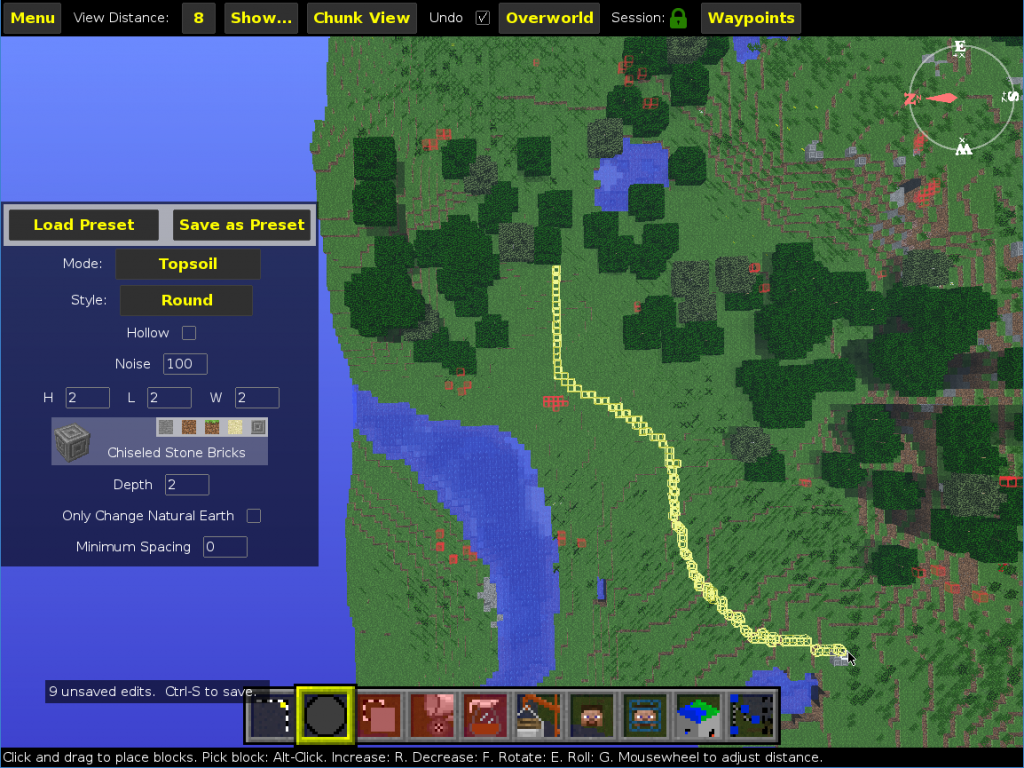
The resulting path will be a bit uneven – there will be raised blocks where there was something above the grass before, such as weeds. You can leave it at this rough look, or manually smooth it out:
More ideas
A lighthouse is a nice natural waypoint.
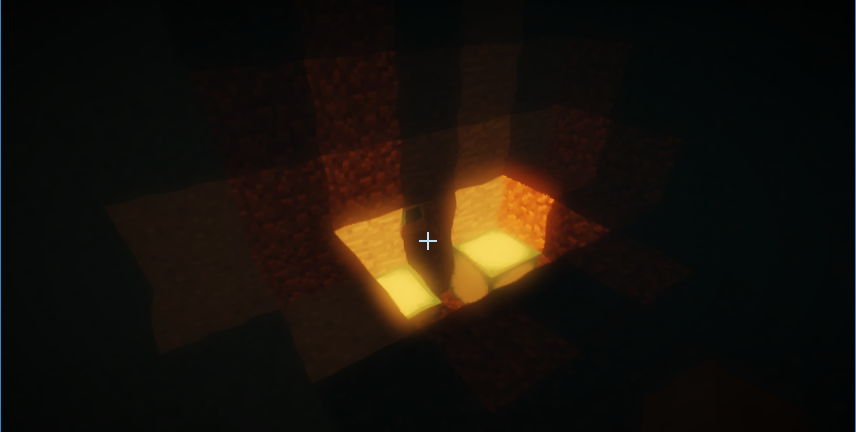
An underwater cave can make for an interesting secret:
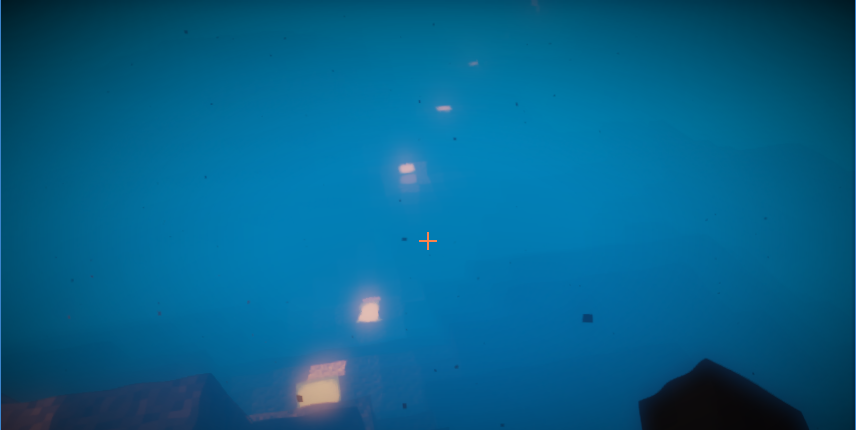
You can map out paths under water with sea lanterns:
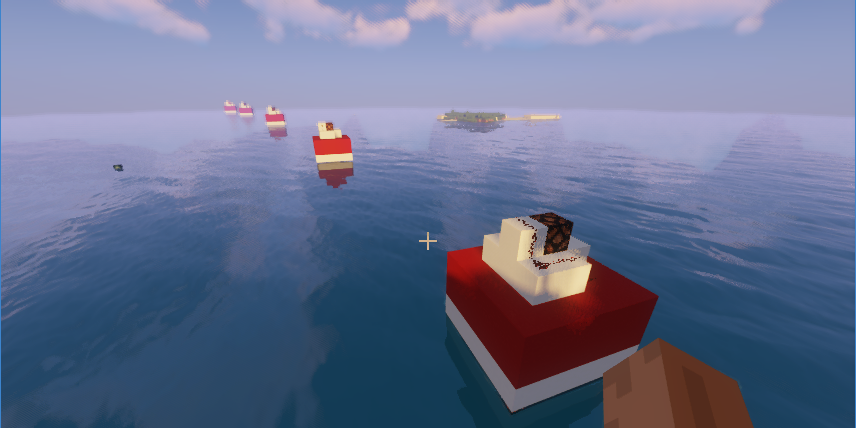
And on the surface with buoys:
They actually blink, using the following mechanism (hidden by white and red concrete): Place four repeaters in a ring-like structure and connect them with redstone:
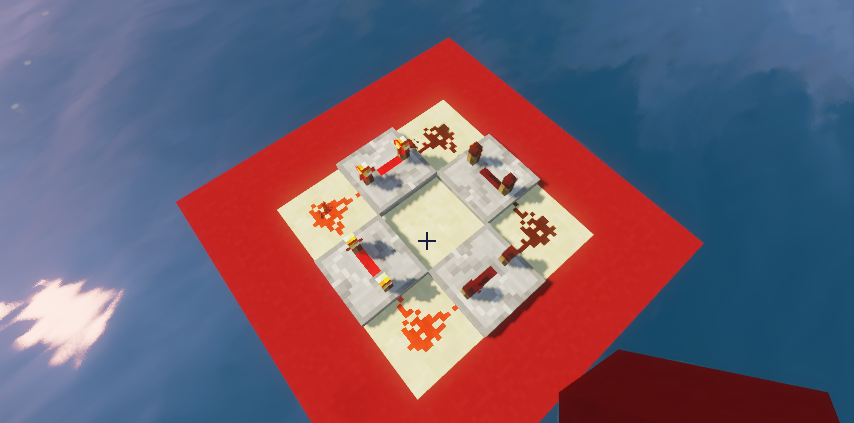
Now quickly place a redstone torch next to one of the redstone blocks, then remove it again immediately. This makes the redstone “signal” go around the repeaters. You can adjust the delay at each repeater – set it to the maximum (4 clicks).
Then, you simply build up using redstone and another repeater:
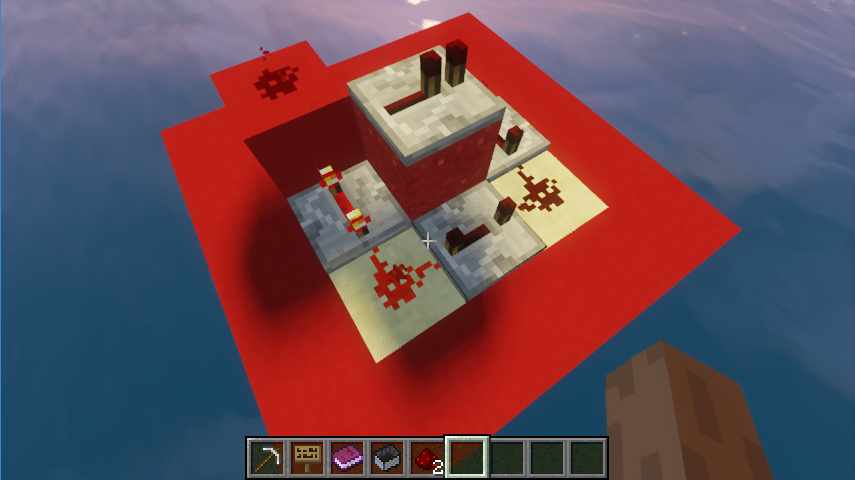

This should lead to the redstone lamp blinking.
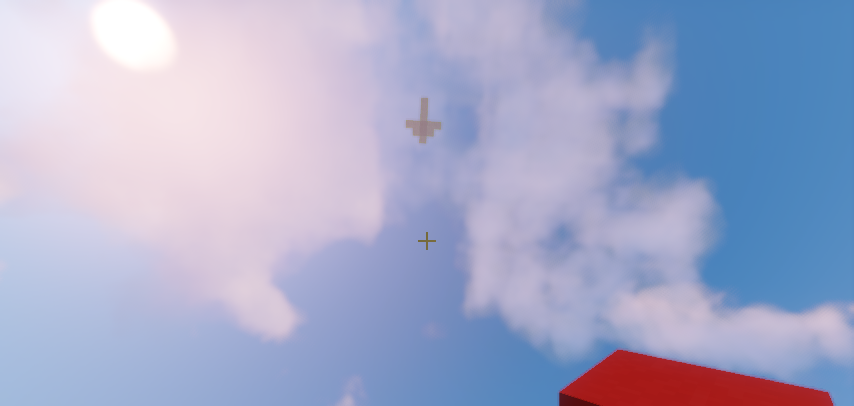
You can use arrow-shaped clouds to give hints:
Using command blocks, you can do amazing things like building entire structures at once, summon NPCs or give valuable items.
The server
Minecraft games can run on your PC, where Minecraft then is essentially a single player game, or on a server, where multiple players can play in the same world.
For the party, you need a server, and you definitely want to have a private server which you can set up and where you can decide who can join a game and who can’t. There are two options:
- Use a company who is hosting servers, i.e they have computers on the internet where they are running Minecraft for you
- Host the server yourself on your local PC at home, i.e. run a special version of Minecraft which allows other people to play the game remotely on your computer
(If you have a publicly reachable server somewhere, you can also set up Minecraft there, but I won’t go into details here, as they can become quite technical).
The easiest option is using a company who is hosting the server. Pick one which offers Minecraft servers specifically, so that you do not have to set up Minecraft yourself. One reasonably priced option is Shockbyte.com where you can get a server for 2.50 USD/month. Note that if you want to simply host the birthday party, one month is more than sufficient.
The console
When managing a Minecraft server, you will eventually have to issue a couple of commands to the server. This is done via the console. The console is a text-based interface where you can enter commands and see output from the server.
If you are using a hosting company, somewhere in the web interface there should be a link to the console. Once on the console page, you will see output from the server, such as the messages shown during startup.
And there will be text field where you can enter commands, such as
/weather clear
which switches from rain (if there is some) to clear weather.
Uploading your world
Once you have a server and the world is finished on your computer, you can upload it to the server. In order to do so, use an FTP program such as FileZilla.
Upload all files in the folder %appdata%/.minecraft/saves/[Name of your world] to the server. Then, in the Minecraft server configuration, select the world you have just uploaded.
Now restart the server, and it should load ‘your’ world.
Setting the game mode
Remember how you created the world in creative mode? For the actual scavenger hunt, creative mode is not well suited. It allows players too much freedom. For instance, they could easily work around puzzles by simply flying around in the world and through walls.
Therefore, switch to survival mode or adventure mode. In survival mode, players have access only to those materials they find in the world. In adventure mode, they additionally are not allowed to destroy blocks they haven’t placed themselves.
In order to switch the mode, go to the console and enter
- For survival: /gamemode [Player] s
- For adeventure: /gamemode [Player] a
Note that you have to do this for every player, and those players must be currently online.
White listing players
You have to be careful to only allow invited people onto the server. By default, anybody who knows the server address, can log on. Never assume that just because you haven’t published your server address anywhere, nobody is going to find your server.
Whitelisting works via the console.
/whitelist on
activates the whitelist. Once you have entered this command, players can only enter the game world if they are on the whitelist. To add someone to the whitelist, use
/whitelist add [Name]
The name is the user name in Minecraft. You can see that name in the lower right corner of the launcher window when starting Minecraft.
/whitelist list
shows a list of all users who are on the whitelist. And
/whitelist remove [Name]
removes the player with that name from the list.
After the party is over
Once the party is over, you can either shut down the server and cancel the service (if you have used a commercial hosting company), or continue running the server for the team to continue their adventure.
If you shut down the server, it may be a good idea to keep a backup of the world in its current state. To do so, download the world files via FTP.
This way, you can distribute the world to each participant for single play, or you can set up the server again at a later time.
 This work is licensed under a Creative Commons Attribution-NonCommercial-NoDerivatives 4.0 International License. For more details on what you can and cannot do with my work, see here.
Hi,
This looks wonderful, but a lot of work to set up. Do you know of any way to buy a scavenger hunt setup for less-savvy parents? Something more turn-key?
Thank you!
No, unfortunately not. It’s admittedly quite some work, and requires a good deal of time to prepare. Unfortunately I cannot share the world as it contains a couple of models which are for private use only.
This is amazing! I didn’t even know where to begin. Is it possible to purchase the party world you made and load it onto my server? I also have a 10-year old who’d love to do this… he actually has been working on his own world for the party, but I doubt it’s this well planned.
I’m just… I don’t think I can pull it off in time… distance learning schooling for four kids and planning a virtual funeral for my grandma – seriously – What do you think?
Unfortunately I cannot share the world as it contains a couple of models which are for private use only. It took quite some time – I am actually in the same boat: Very little time, and a lot of things on my plate, not the least of which is distance learning for our kids.
Would you be open to sharing your scavenger hunt world? I
Sorry, I cannot share the world as it contains a couple of models which are for private use only.