Author Archives: admin

Huge collection of vintage Donald Duck papercraft templates

2016-12-18

For those of you who are fans of Donald Duck and/or papercrafting, here is a huge collection of vintage papercraft templates which were part of the monthly German ‘Mickey Mouse’ magazine. The site’s name is Seite 42, which translates to ‘page no. 42’ – the place in the magazine where the papercrafting projects were to be found. The site and templates are in German, but most don’t require much in terms of instructions, and for those that do, you can hopefully use Google Translate.

3D printing fixed it

2016-11-22

Ok, so the big promise of 3D printing is that I can get whetever item I need at any moment, in whatever shape I desire, which would be very handy for repairs and replacements. As anyone dealing with 3D printing can attest, the truth is that it is not always that easy.

Usually making replacement parts is either too time consuming and tedious, too difficult (in particular getting correct measurements of complex shapes and turning them into 3D models), or the part has some technical requirements that 3D printing cannot fullfil (e.g. heat resistance, strength, weight, etc). I know, today you can 3D print almost any material in almost any configuration. Just not at home, and just not at a reasonable cost.

But every now and then, something in our household breaks or gets lost where it’s almost trivial to replace it with a 3d printed part. One such thing was a clasp. Here it is:

p1380314

It’s  a very simple interlocking clasp which works nicely. The original was made from metal and curved, so it looked more elegant, but replicating the original shape would have taken quite some time. So I went for a simple square shape. Here is the clasp unlocking:

p1380317

p1380318

I didn’t want to cut and resew the straps, so I left small gaps in the clasp, threaded the straps through the gaps and then sealed them with extra PLA directly from the hotend.

p1380315

Here are the STL files: buckle05_femal.stl, buckle05_male.stl

Another very useful replacement part was this lamp holder:

p1380749

p1380750

It’s not the most beautiful accessory in the world, but it helped me revive one of these old office-style lever lamps. We had lost the original base a long time ago, and the new one simply attaches to the edge of my desk. Looks hacky and makeshift, but works nicely.

Here is the STL: lampholder_02.stl


3D printed key knob

2016-10-24

When buying a new lock for your front door, smart people consider buying a lock with a turning knob on the inside, like this:

doorknob

Photo by user BlastOButter42 on Wikipedia

It allows you to lock – not just close – your front door with a turn of the knob. Well, I didn’t, and thus I ended up with a lock where I had to put my key in whenever I wanted to lock my door.

Well, it’s never too late to fix something like this. The solution is simple: Just print a knob around a spare key. And I did. This is what it looks like:

2015-03-15-09-57-00

2015-03-15-09-57-14

I went with a square shape, as it’s actually easier to turn than a round one. The way I did it, is I created a rounded cube in Blender, then removed an outline of my key from the inside. I generated the gcode file, then separated it into two files – one containing the lower half, and the other containing the upper half. I printed the first file:

2015-03-09-22-15-51

Then I inserted the key:

2015-03-09-22-16-43

And continued printing the second half (with absolute z coordinates, the printer starts off right where it stopped before; you just have to be sure that the head is first raised to the appropriate height before moving along x and y; otherwise it might crash into the already printed part).

Here is the STL file (which obviously doesn’t work for keys of a different shape):

doorknob.stl


New paper miniature airplanes

2016-10-18

Remember my miniature airplane display case? Well, I recently received a custom order for the design of new airplanes. Turns out the requested airplanes are some of the most interesting ones ever engineered. It was great fun working on the models and reading up on the background of these planes.

First was the Boeing 747, an aircraft that doesn’t need any introduction:

p1450497

Next came the Lockheed SR-71 “Blackbird”:

p1450498

This was one of the first stealth airplanes, with a very meticulously planned small radar cross-section. It was capable of sustained Mach 3 flight, and incredibly innovative for its time. The SR-71 flew on specially formulated fuel, and usually took off with a partial fuel load, to reduce stress on the brakes and tires, and was refueled in-flight. The Wikipedia article for the SR-71 is well worth a read if you are interested in technology at all.

Then we have the Lockheed Constellation, a propeller-driven, four-engine transatlantic airliner:

p1450500

And the North American P-51 Mustang, a single seat WW II fighter:

p1450505

Finally, the Chance Vought Corsair: This airplane has very bizarre looking angled wings, but they not only make absolute sense in the context of the technical requirements, but are in fact an ingenious solution: The airplane was planned to be carrier-based, and thus the wings could be folded up. By attaching the landing gear at the lowest point of the angled wings, the airplane got enough ground clearance to allow for a 4m span propeller.

p1450510

Alphabet calendar

A couple of days ago I received in the mail a copy of a new 2017 calendar – the theme is ‘hand-lettered and artsy alphabets’, published by Amber Lotus Publishing. The calendar features – among other very nice artwork by other artists – my papercraft alphabet on the December page.

p1450538

p1450539

Speaking of calendars, rest assured my dino calendar will receive a 2017 update in the not too distant future (definitely well before the new year, so that you have enough time to build the update).

Tutorial for the business card holder

2016-07-05

Some of you may remember the series of business card holders (butler, scientist, sheriff, beaver) I did some time ago. Here is a quick tutorial on how to make them:

Start by cutting out along the contours of the template:

P1420805

Fold along the edge of the base, so that the front is at a 90° angle, then fold the flaps at the sides of the front backwards:

P1420806

Fold the sides up and glue them to the flaps:

P1420807

The extension of the base has three sections. Fold them inwards, like this:P1420808

Then glue the flap at the end back onto the base, so that it creates a little wedge. this wedge will keep the business cards a bit above the edge of the base, so that they are easier to grab. If you want, you can glue a little weight into the inside of the base.P1420809

The last step is folding the hands of the butler inwards, so that they can hold one ‘sample’ card at the front:

P1420810

Sample package for clients

2016-01-11

Last week, I shipped out a couple of sample packages to clients who are interested in commissioned projects. The samples consist of a collection of stuff I have been working on in the past months, including some toys, the vaccines book, the alphabeticals book, a customized Maneki Neko, and some promotional toys.

When I had everything collected on my desk, I was quite happy with the collection. So happy that I had to share it with you. This is what you get when you ask for a sample if you are sincerely interested in commissioned work.

P1400467

P1400468

Here is the dino scientist and, in the foreground, two human scientists from the Cubicity set:

P1400470

The vaccines book:

P1400472

Opened at the world map page:

P1400481

Everything ready to get shipped:

P1400486

Happy New Year!

2015-12-31

I wish you all a Happy New Year! May 2016 be peaceful and in a good sense “boring”, so that we can get excited for the right reasons.

happy_new_year

Above is a little New Year’s card I made for friends and family – and which I’d now like to share with you, dear reader.

And here, just to give you an idea of the process, is the very first sketch of the idea:

happy_new_year_sketch

You may notice that the sketch contains a bunch of happy little animals. Those turned out to be a bit too distracting and noisy, so they had to go – with a very generous exception for the bug and the butterfly.

Concept for 12 Days of Christmas Paper Models

2015-12-08

Even if you are not from the UK or US, you probably know the song 12 Days of Christmas. I am somewhat partial to that song, with its very nice, over the top imagery of ever more luscious gifts being piled onto the dearly loved recipient.

It lends itself very well to illustration, of course, and so I thought I’d give it a try to turn the gifts in the song into paper models.

This will take a while, of course, but the first step was to determine the level of detail. Making all 364 gifts in total would take a lot of time, and even just making the 78 gifts of the last verse will be a challenge, so each gift should be easy to make. Which requires a good deal of abstraction.

Here are the first attempts of some of the gifts, but I still consider some of them to be too detailed:

The Partridge:

P1390750

The turtle doves:

P1390743

The French hens:

P1390747

The golden rings:

P1390748

Of course, the models will be colored later on. In fact, I am thinking about two versions, one which has the typical mono-colored face “low poly” look, and one which is more detailed, almost like painted wooden toys.

Well, I am pretty sure I won’t finish this before (or even shortly after) this year’s Christmas, but maybe for next year. If you are interested, I’d like to hear from you.

3D printed loom thread separator

2015-05-12

My daughter is the proud owner of a loom. Recently her interest in the loom was rekindled by a school project, and as we wanted to start working with the loom again, we noticed that one part was missing. A wooden bar with slits which keeps the individual threads nicely separated, so that the shuttle can go above every second one, and below every other second one. This part certainly has a nice and professional name among those skilled in the trade, but I don’t have a clue what’s it called.

Anyway, since it was nowhere to be found and an extensive search of house and garden didn’t turn up anything (as expected), I took it upon me to print one. The model was quickly done in Blender, as it is just a bar with regularly spaced slits.

Printing took about 4 hrs, but the result was quite nice (in bright orange PLA):

2015-04-27 18.29.48

2015-04-27 18.29.59

Work in progress: Paper mechanism

I am currently working on a new project which will be an animated / kinetic model, a bit similar to the multiplication machine. I have to say, a kinetic model with its moving parts is at least an order of magnitude more difficult and time consuming than a static model. Here are pictures of various prototypes and tests:

P1360320

2015-02-06 16.26.32

P1360321

2015-05-09 10.13.26 2015-02-14 23.26.50

The templates are cut out using a cutting plotter (a Silhouette Portrait, for that matter):

2015-02-14 23.26.58

Even with the printer, it’s quite a bit of work, as the mechanism is somewhat complicated and needs a lot of iterations to get it quite right.

The problem, with paper-based mechanisms, is not so much to get something that works in general, but to get something that works every time, all the time. Paper tends to get stuck, to bend, to tear, when put under pressure. As such, it’s not the ideal material for mechanical things, but at the same time it’s vastly more accessible and needs much simpler tools than traditional materials such as wood and steel.

As for what this project will look like in the end, it’s still a secret. But if you are really curious, register for my newsletter, and I will tell you as soon as it’s ready to see the light of day.

How to print A4 templates on US letter paper

History, unfortunately, led to two different paper format systems in the US and Europe – US letter and the A series (here is an interesting history of paper sizes). The PDF templates on my website are generally in the A4 format. If you are using US letter format (or any other format, for that matter), you will notice that the templates may not fit entirely on the page. US letter is a bit wider than A4, but has a shorter height.

In order to fit the templates on the page, you will need to adjust the printing options. This is how you do it in Adobe Reader XI: When you click on the ‘print’ icon, you will see this dialog:

actual_size

Under “Size Options”, you will see three options: “Fit”, “Actual size”, and “Shrink oversized pages”. If you are using US letter paper, and “Actual size” is selected, the page will not fit. The preview will look like this:

actual_size_large

You can see that part of the page is in the dark gray area at the bottom, which will not fit on the page and will not be printed. To print correctly, you need to slightly scale down the page. Adobe Reader can do that automatically if you select “Shrink oversized pages” (you could use “Fit” instead, which would do the same for oversized pages, but would also scale up pages that are smaller than your actual paper size).

When you select “Shrink oversized pages”

shrink_oversized

the preview will look like this:

shrink_oversized_large

Now the whole template fits into the printable space, at a scale of roughly 91%. If you are printing templates with multiple pages, please make sure that you print all pages with the same scaling option, otherwise the different parts will not fit together.

Back from AERO Expo

2015-04-27

One week ago, I was at the AERO Expo – a big trade show for general aviation. I was invited to join an exhibition of a couple of very talented artists who paint, design, and photograph on the topic of aviation. I highly recommend the group’s website, flugsucht.de. It’s in German, but you don’t need to speak German to appreciate the very impressive artwork.

The show was quite amazing – especially for someone like me who hasn’t been in close contact with aviation before. I have to say, I am very tempted to get into general aviation. At the moment, it’s a bit difficult due to several other very time consuming things on my agenda, but let’s see.

Here is what I showed at the exhibition – small paper airplane models. If you are interested, these are available via Etsy.

P1350337-001

P1350832

P1350837

Here is the stuff, ready packed for the show. Quite a lot, as I planned (and actually did) to build models at the show, and needed some tools for that.

2015-04-14 10.32.59

After arrival, starting to set up the display:2015-04-15 09.06.14

The group raffled some artwork – each day, visitors could win two pieces by different artists. The tombola was quite some fun. My display box with airplanes went to a very nice lady from the Le Bourget airport near Paris – congratulations, if you read this!

2015-04-15 16.46.51

Here you can see the tombola in full action, with Kathrin and Tobias on stage:

2015-04-18 16.40.23

In addition to the art exhibition, the trade show itself was very nice. Here is the frame of a reconstructed vintage plane:

2015-04-16 09.17.37

Lots of ultralight aircraft:2015-04-16 09.28.31

Quite a number of beautiful vintage aircraft:2015-04-16 09.36.11

Here is a very nice (and very British!) gyrocopter:2015-04-16 09.49.16


This week on Thingiverse

2015-04-24

Here is a run-down of a few nice things I found on Thingiverse, ready for 3D printing. Clicking on the images will take you directly to the Thingiverse object. Let’s start with some transportation options. This nice rocket, by Gabor Vecsei, has that nice quirky vintage cartoon look:

rocket_for_printing_ad_edit_preview_featured


And here is a nice model of the Edge 450 – the airplane used in the Red Bull air races – by mitchr:

edge_assembly_repaired_preview_featured


And if you are more of a nautical person, here is a beautiful ship, by Grant Edwards:

Ship_preview_featured


3P3D published a model of a Chicago fire hydrant, created via photogrammetry. Photogrammetry is a process where you take an (ideally large) set of photos of an object, from different angles, and use software to deduce the original 3D contour. For those of you who have already tried it, you know how tedious and difficult it can be to get the result right. The hydrant turned out very nice, I would say.

CFD_Hydrant_repaired_preview_featured


Makers Empire, who are creating 3D printing software, have published this spider. I like how they balanced the naturalistic model with rounded, slightly abstracted shapes. Very nice use of 3D primitives.

Sparky3d_Spider_preview_featured


And Ashwin Mandal created this beautiful model of the Sidney opera house.

Opera_de_Sydney_preview_featured_preview_featured


Finally, something useful: Paulo Leandro dos Santos made a hard disk adapter from 3.5″ to 5.25″. These can be picked up very cheap in computer stores, but if you are in a hurry, it might actually be easier to print one.

IMG_2832[1_preview_featured

3D printed airplane miniature

2015-04-13

This was an experiment: I wanted to see how well Shapeway’s stainless steel prints turn out, especially for tiny details. For a test, I picked a model of the Lockheed Model 10 Electra – the airplane Amelia Earheart flew on her last flight.

I will be showing some paper airplane models at the Aero Expo starting on Wednesday, April 14, and I thought it would be nice to bring along a 3D printed steel model as well.

I had made a paper model of a similar Lockheed airplane before, and after tinkering with the schematics a little bit (more on this in a future tutorial), I had a 3D model that was fit for printing.

2015-04-13 17.25.48

Turns out, Shapeway managed to produce a very nice print. This is not plastic, but stainless steel. It’s bronze-infused, meaning it has an almost golden sheen to it.

2015-04-13 17.25.10

As far as I know, Shapeways uses a sintering process to print these, so there is no need for support material, and thus no visible attachment points. Being used to working with plastics, the weight of a stainless steel model feels great, too.

The details turned out very nice. I was concerned with the propeller blades, as they are very small and thin, but they printed nicely and don’t feel like they will break off easily.

2015-04-13 17.24.49

So, all in all I would consider this a success, except maybe for the price, which is not horrible, but not insignificant either – after all, this is a very small model (about 5cm long). Nevertheless, if you want to have one, too, you can order it from Shapeways. Mine took about one week for printing and shipping.


Bird Cage Egg

2015-04-02

This is a 3d print I made last minute for Easter: A bird in an egg-shaped cage. The egg is just a little bit smaller than a real chicken egg. I like this one in particular because it is something that would be difficult to do with injection molding – at least in one piece and one step.

P1350881

The kids like it very much. And it is a fast print – about 20 min.

P1350868

You can find the model here. I have made two variants, one with a ring to hang it, the other without.

P1350882


Also, since we are on the topic of Easter trinkets, here is a beautiful model by Mirice on Thingiverse which I printed: An origami bunny in plastic:

2015-04-02 23.09.06

Alphabeticals: My papercraft alphabet as a book

2015-03-01

Great news: My papercraft alphabet is coming out as a book! So for those of you who felt that printing and cutting out the 26 letters was a bit too much of a time investment (which, frankly, I absolutely understand), here is your chance of making the alphabet:

P1350465

P1350653


The letters in the book are die cut, ready to be broken out of the page very easily. Here is a look inside:

P1350654

P1350655

P1350656

P1350657

Here is a little video:

The book will be available in the UK at the beginning of March. Here is the Amazon link, for instance. The book makes a nice gift for preschool and kindergarten kids – anybody learning to read and write. Actually, I have found that older children love it, too, even if they are well beyond first grade.

As for other countries, for the time being you would have to order it from a source in the UK, I’m afraid, but there is a chance that it will eventually be published in the US and/or Germany as well. Let’s see – depends on how well it works out in the UK, I think.

Exhibiting at the Aero Expo, April 15-18, Friedrichshafen

For the aviation fans among you, this might be interesting: I will exhibit paper art at the Aero Expo. The Aero is a global trade show for general aviation, taking place in Friedrichshafen, Germany (near the very beautiful Lake Constance) April 15-18.

I will be part of a very nice art show called ‘AEROkunst’ which happens inside the trade show. If you are interested in aviation and/or are in the region anyway, this would be a nice opportunity to meet up. Feel free to drop me a line via the contact form, if you do.

I will -obviously – exhibit mostly airplane-related things, such as these:

P1340535


P1340314

I’m currently preparing a couple of new things for the show – if you are interested, register for the newsletter, and I will send you an update soon.

3D printed cookie cutter bear

2014-12-16

P1340863

My wife found a very nice idea on the web for cookie bears holding almonds. Naturally, we wanted to have those bears, too. However, we didn’t have a bear-shaped cookie cutter. So I turned to Thingiverse and found this very nice cutter from user rozoom, which not only cuts out bears, but also makes dents for the eyes and nose.

I felt that the arms could be a bit longer, in order to be easier to wrap around the almond, so I created a slightly modified version. Works like a charm:

2014-12-13 15.43.36


P1340859

P1340860

And – as a bonus – here are a few other cookies we made:

P1340869

P1340867

P1340866


And my personal favourite, little Lederhosen bear:

P1340864

Planetary Baubles

Prompted by a comment from Marcus (thanks for the great idea!), I have turned the paper planets into Christmas baubles.

P1340919

They actually turned out very nice, and in mid-air from a tree gives off a much more planetary impression than when they sit on a shelf.

P1340889

P1340884

P1340896

And they are easy to make, too. When assembling the planets, simlpy glue a looped thread to the top (from the inside). I actually had to attach the thread to the already finished planets, which I did like this:

I took thread (a green one, for better camouflage in the tree) and a couple of matches:


P1340870


Broke off short pieces from the matches, and formed a loop with the thread:

P1340872


Tied the thread at the non-loop end to the matches:

P1340873

And finally, poked a hole into the top of the planets and pushed the match through (carefully, so that the thread would not slip off the match).

P1340874

One note: The planets come in different sizes, to (very roughly) approximate their real sizes. If you want to decorate a tree with these, you may want to scale them so that they have roughly the same size. Below, you will find the planets scaled to the same size. In these templates, I have also left out the data on the bottom of the planets, as the text interferes with their use as baubles.

3D printed spider ring

You got to love 3D printing: The turnaround time from an idea to its execution is extremely short. Yesterday in the evening I had the idea for a spider ring (don’t ask – that’s the kind of ideas you get when you have small kids). Scavenged Thingiverse for a spider model, and found this very nice Creative Commons model.

2014-12-02 21.14.28

Created a ring in Blender, added a stud to the spider, to make it easy to glue it to the ring, and printed the whole thing (actually, in two steps, first the spider, then the ring). The whole process took about half an hour. Nice.

You can find and download the final model here.

3D printing complex objects without support

2014-11-30

With the popular and affordable standard method of 3D printing, FDM (fused deposition modelling, a fancy way of saying that the object is created by squirting a string of liquified plastic layer by layer onto a support), one problem is that overhangs are difficult to print. Anytime something protrudes horizontally from a model, the printer literally needs to print into thin air.

The obvious solution is support: These are elements that are not part of the model, but are printed underneath overhangs so that they are stabilized. The support elements need to be cut off after printing, and often require quite some post processing, to make the finished part still look good.

I recently wanted to print the comet 67P (this model, to be precise). It’s not trivial to print, as the comet does not have any flat surface you could use as the base. I didn’t want to use support, as for this model it would have meant cleaning and filing a large part of the surface. So here is what I did instead:

I digitally cut the model into two halves, so that I would have two flat surfaces. I printed the first half. Then I printed a negative ‘mold’ for the first half, which was essentially a cube from which I had subtracted the comet shape with a boolean operation in Blender. I then put the first half upside down (with the flat surface at the top) into the mold, positioned the nozzle of my printer at exactly the right height on the z axis, and printed the second half right on top of the first half.

This is the negative “mold”:

P1340698

This photo was taken after printing the complete object. The squiggly string draped across the mold is the brim for the second part, which obviously was printed partially into thin air (should have turned brim printing off). If you look closely, you can see that I put a short strip of double-sided sticky tape into the mold, to keep the first part fixed.

This is right in the middle of printing the seond half onto the first one:

P1340692


And this is the printed comet:

P1340700


The difficulty is to get the second print aligned with the first one. There is no software support for this as of now (would be a nice addition to Slic3r or Repetier Host). So what you have to do is align the second half and the mold perfectly on the x and y axis, slice them, print the first half, then the mold, keep it stuck exactly where it is on the support, and then print the second half.

For the second half, you have to manually move the nozzle on the z axis until it is right above the top level of the mold (too low, and it will crash into the mold, too high, and the second part will fail to print properly, or will at least have the first few layers come out very loose and unsightly). Then home it on the x and y axis,

Now you have to disable homing in the G code. For this, I had to delete the command “G28” (“homing on all axes”). Since Slic3r creates G code with absolute coordinates, we need to tell the printer to assume the current position on the z axis as zero. This is done with the command “G92 Z0”, which sets the current position on the z axis to zero. Here is a nice reference of G code commands.

Depending on your model, you may actually not need a whole mold – most often, a number of struts is enough. This is how I printed this business card holding hand:

2014-11-29 13.27.40

Started by printing one hald (the backside):

2014-11-24 16.01.49

Removed it from the support, then printed the struts:

2014-11-24 16.16.32

Note that the struts have indentations which perfectly fit the back of the hand:

2014-11-24 16.16.39

2014-11-24 16.16.44

Then I positioned the nozzle, and started to print the second half (the front):

2014-11-24 16.55.09

Again, you an see the brim I forgot (once again!) to turn off. It felt strange, simply picking up the finished object instead of carefully detaching it from the support:

2014-11-24 16.55.20

The struts are created just like the mold. You create a couple of cubes, then subtract the object from them.

blender2

I have first split the hand into two halves, using a large cube and two boolean operations (“Add modifier, Boolean, Difference / Intersect”). Then I have created seven small cubes, and joined them. then subtracted the back half of the hand using once again “Difference”.

blender1

The result is not perfect – you can still see a seam where the second half starts – but depending on how well the nozzle was aligned on the z axis, the seam can be quite small. It’s definitely better than gluing to halves together, and depending on the model looks better than using support.

Working on a poster…

2014-10-10

Currently working on a poster for a discussion on the good, bad, and ugly of electronic media for kids. Here is a quick glance at the work in progress. The draft:

media_draft


Illustrated in CorelDraw:

media

Ready for Halloween? 3D printed skull clothespin

2014-10-06

For Halloween, I designed a clothespin with a skull attached to it (don’t ask, all kinds of weird ideas happen when you have kids):

P1340236

This one was 3D printed in PLA, which is a sturdy enough plastic to withstand the forces of the clothespin spring.

P1340238

Here it is in action:

skull2

In the unlikely case that you want to make one, too, you can find the files on Thingiverse.


Speaking paper parrot

2014-10-01

Today I wanted to share a little prototype I was working on for a charity event. It’s not yet finished, but well on its way. This is a money collecting box with a parrot sitting on top of it. Whenever someone drops money in the box, the parrot says something.

P1340229


Here is a video:

How it works: In the box is a regular Android phone, running a custom app I wrote. The app is essentially a motion detector, registering when the camera image changes and playing one of a number of prerecorded sounds.

The parrot is a low polygon (facetted) paper model. I am currently working on coloring it, and it will be released here as soon as it’s done. The parrot works quite nicely as a standalone model, without the box and app, by the way. It’s a bit tricky to build, especially around the beak, where the polygons are a bit crowded, but it came out quite nice at the first build.

P1340228 P1340226


As for the Android app (which also works well independent of the parrot), there is still some way to go before it can be released. At the moment, it’s a very early prototype, which needs quite some more tweaking and testing. If you are interested, I suggest you let me know via the comments or the contact form and/or register for the newsletter.


Birthday party theme: Under the sea

2014-02-10

My daughter’s birthday is coming up, and she asked to have a theme: Under the sea. Today, we started on the invitation cards:

underthesea_card

Not too shabby, don’t you think? At least my daughter liked it. I will post more on the theme once the party is over.


Valentine day projects

2014-02-01

If you are still looking for some quick and easy project for Valentine’s day, here is a compilation of the Valentine projects I have done:

P1080908

The valentine vase is a small papercraft model that is ‘2.5D’, i.e. it’s not really a three-dimensional model, but rectangular planes make it look (and stand up!) like one. This one is quite fragile, but looks quite nice.

P1160929


The rotating image card is a nice trick: By rotating the image, it turns into another one – in this case, from a smiling emoticon to a heart.

couple

And finally this year’s entry, the hugging couple on a shelf. This one is very easy to make.


A comprehensive backup strategy

2014-01-04

Today I want to stray from the usual path of papercrafting and talk about something entirely different: Backup strategies. I was prompted by the recent reports of the Cryptolocker malware to reconsider my own strategy, and I think I came up with quite a nifty scheme for backups. Just as I did, you may think that your data is save because, well, of course, you back up. But do you really cover all possible cases where your data is at risk?

At the basis of a good backup strategy is risk assessment and management. Now, what are the risks your data face, and what can (and should!) you do about it? Well, very coarsly, the risks are:

  • Hardware failure
  • Viruses
  • Hacking
  • Inconsistencies in the file system
  • Disasters, e.g. lightning, fire and water
  • Theft

It’s helpful to see how the risks affect different types of data. Your data generally falls into the following categories:

  • ‘Working’ data, i.e. things you are currently working on, such as tax reports, a Powerpoint presentation for work, or a letter to a family member
  • The operating system
  • Application data, i.e. data stored implicitly by various applications, such as the list of previously edited files, customized settings, or thumbnail images from photo management software,
  • Personal media: videos and images you have taken

There is a wide range of backup strategies, each with its own advantages, disadvantages and limitations. In order to see how they fit the risks and data types, we can use this matrix:

Working data Operating sys. Applic. data Personal media
Hardware failure Cloud System backup System backup Offline copy
Viruses Cloud Offline copy Offline copy Offline copy
Hacking Cloud Offline copy Offline copy Offline copy
File system Cloud System backup System backup Offline copy
Disaster Cloud System backup System backup Offline copy
Theft Cloud Offline copy Offline copy Offline copy

Why do we need this table? Well, some data must be treated differently than others. Personal media files, for example, are quite large and it is difficult to back them up over the internet. ‘Working data’, on the other hand, tends not to be that big, but needs to be backed up very frequently. Even losing data from one hour ago may amount to significant costs in these cases.

And some risks need to be treated differently than others: Having an exact 1:1 copy of your hard drive, for instance, is nice when you want to recover the exact state of your computer after, say, a hard drive failure. But it’s very inconvenient, to say the least, if you accidentally deleted just a single file. You would not want to wait through restoring the whole hard drive just to get to that one file.

Let’s go through the table step by step:

For data you are constantly working on, use a cloud storage system such as DropBox or SugarSync. They allow you to set up a directory on your harddrive that will automatically be mirrored “in the cloud”, i.e. all files that are created or modified in this directory will be copied in a safe and secure manner to a server. This covers all cases of data loss nicely, but has two disadvantages: First, it is not convenient for large files or large numbers of files, as uploading changed files takes too long. Second, in order to be protected against viruses and hacking, where files may be deliberately and covertly manipulated, you need to be able to go back to a previous version. Some cloud services do this better than others. I have found that SugarSync keeps the last five versions of a file, for instance, whereas with DropBox I have had cases where I could go back to previous versions and cases where I couldn’t. Therefore, I highly recommend to try SugarSync.

With cloud services, you can replicate your “cloud archive” on two or more computers. I highly recommend doing so if you have access to two computers (such as a desktop and a laptop). In this way, you automatically have a second ‘local’ backup on the other computer, in addition to the data being stored in the cloud.

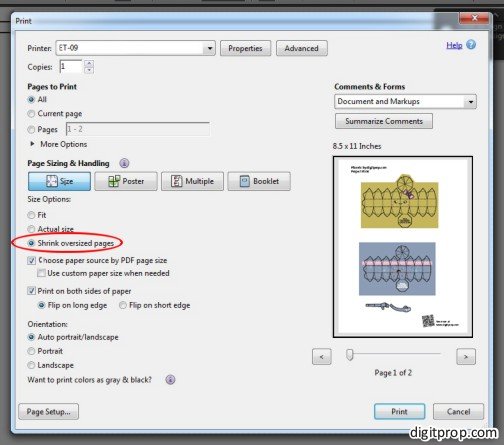
What about your operating system? Well, assuming you have the necessary installation disk (and if you don’t, please create an installation disk right away), you can always reinstall. However, reinstalling is very time consuming, especially if you then have to reinstall all your applications and adjust all the settings. With most modern systems, including Windows 7 and 8, you can use on-board software to back up the system in its current state. For Windows, it’s called ‘Backup and Restore’, and it can be accessed as follows:

Open ‘Backup and Restore’ by clicking the Start button, clicking Control Panel, clicking System and Maintenance, and then clicking Backup and Restore. Then click ‘Set up back up’. If you ‘let Windows decide’ which files to choose, it will automatically back up your personal files AND a system image if the target drive is large enough and is NTFS formatted. It will not back up program files. That means in the case of data failure, when you restore the system, third party programs are missing (see below on how to tackle that problem).

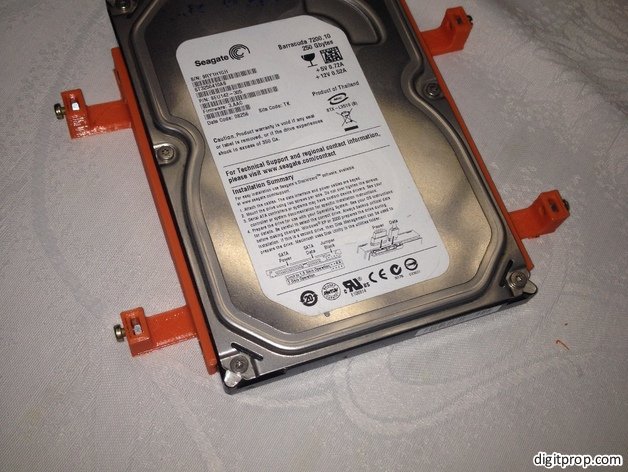
This must be done on a separate hard drive, of course. If you don’t have two hard drives in your computer, you can buy one for internal installation (if you have the space). Or you use an external drive, to be plugged into the USB port. Edit: I originally recommended Seagate HDDs, but see for the comments on a discussion about the reliability of various HDD brands.

Very importantly, please use a harddrive without internal encryption. This may sound strange, as encryption = security, right? Well, not really. A harddrive with internal encryption does only protect against theft of the hard drive itself, without the controller (as otherwise, with the controller, the hard drive can be read again). With an external hard drive, the probability of it being stolen without the inbuilt controller is zero. So you don’t gain any security. However, you lose the ability to restore the drive if, for any reason, the inbuilt controller breaks. So hard drive encryption primarily puts you at the risk of data loss.

So what happens if your system is compromised by a virus, such as Cryptolocker? A system image on a second hard drive will be affected as well, if it was connected to the computer at the time of infection. And if your computer is stolen, it is highly likely that an inbuilt, attached or nearby external hard drive will be gone as well. For these cases, you need an offline copy, i.e. a copy of your data on a hard drive that is not permanently connected to your computer.

What I did is, I bought the above-mentioned  Seagate Backup Plus 1 USB hard drive (which may not be the most reliable one, see the comments for more details). I connect it to my computer only once every 6 months, perform a complete system image copy, unplug it and store it in a different location, about 100 miles from my home. This makes my data pretty safe even in the case of severe disaster. The location should be far enough so as to not be affected by any reasonable risk, but close enough so that you can get the drive in a reasonable amount of time when you need it.

Now, how to do a perfect offline copy? Buy a large enough hard drive so that all your data plus your operating system fit at least twice onto it. Then, back up everything twice: First, create a directory and copy all files on your hard drive individually into this directory. This will be very useful when you find that a small to medium number of files have been compromised, and you need to get to these individual files quickly.

Then, make a system image. A system image is a 1:1 copy of the exact layout and content of your hard drive. A system image is a monolithic block, i.e. you cannot access individual files from it (thus copying all files individually in addition to the system back image). However, you can restore your system exactly like it was at the time of the backup. It’s sufficient to create a new system image every couple of months, or whenever your computer setup changes significantly. Most parts of your system don’t change much over time, and if you have saved your frequently changing files in the cloud, it’s easy to get from the system image to the current state by copying them back.

Very importantly, a system image as an offline copy should be created when the operating system is shut down. That is, you need to boot a special backup program which will copy your system while it’s not active. One highly recommended such program is Clonezilla. At the link, you will be able to download it for free. The website also contains detailed instructions on how to use it. Essentially, you will create a so-called ‘live CD’, from which you can boot your system and make an exact copy of your hard drive onto a second hard drive.

The bottom line: By combining a cloud archiving service, a built-in or permanently attached hard drive for automated system backups and an external hard drive for offline copies, you will cover all risks listed above. The whole backup strategy is very manageable, as it is mostly automated (cloud and system backups). The only manual step, the offline copy, is required only every couple of months. Be sure to make a fresh offline copy at least every six months, as this will ensure a reasonably up-to-date copy AND it will ensure that your external hard drive is actually still working.

One last and very important remark: If you are not computer savvy or are unsure about the exact steps required, please ask someone for help, preferably someone whom you know well and trust and who can help with your specific system. It’s easy to make a mistake with your backup strategy, and such a thing can be very costly. In the worst case, by operating a backup program wrongly, you could actually destroy the very data you wanted to back up. So be careful and take it slowly!


CorelDraw 11 crashes on Core i7 CPU

2013-11-08

I just had to reinstall CorelDraw 11 on a relatively new machine with an Intel Core i7 CPU, running under 64 bit Windows 7. I know this is an unusual scenario, but I also know that a lot of people still use older CorelDraw versions, so I thought I’d share a problem and its solution:

When moving (dragging with the mouse) objects, CorelDraw immediately crashes. The solution, it seems, is to turn two options off: Go into “Tools -> Options”, then to “Display”, then uncheck the options “interrupt refresh”, “refresh manually”, and “use offscreen image” (I hope these terms are correct; I use the German version and had to guess while translating back into English).